Documentation Index
Fetch the complete documentation index at: https://docs.krea.ai/llms.txt
Use this file to discover all available pages before exploring further.
Krea Enterprise Only — SAML SSO is available exclusively for Krea Enterprise customers. Contact our sales team to learn more about Enterprise plans.
Prerequisites
Before you begin, ensure you have:Verified Domain
Complete Domain Verification first
Workspace Role
You must be a workspace owner or admin
Identity Provider Access
Admin access to your IdP (Okta, Google Workspace, etc.)
Enterprise Plan
Active Krea Enterprise subscription
Step 1: Get Krea’s Service Provider Details
After completing domain verification, the setup modal will display the SAML configuration section.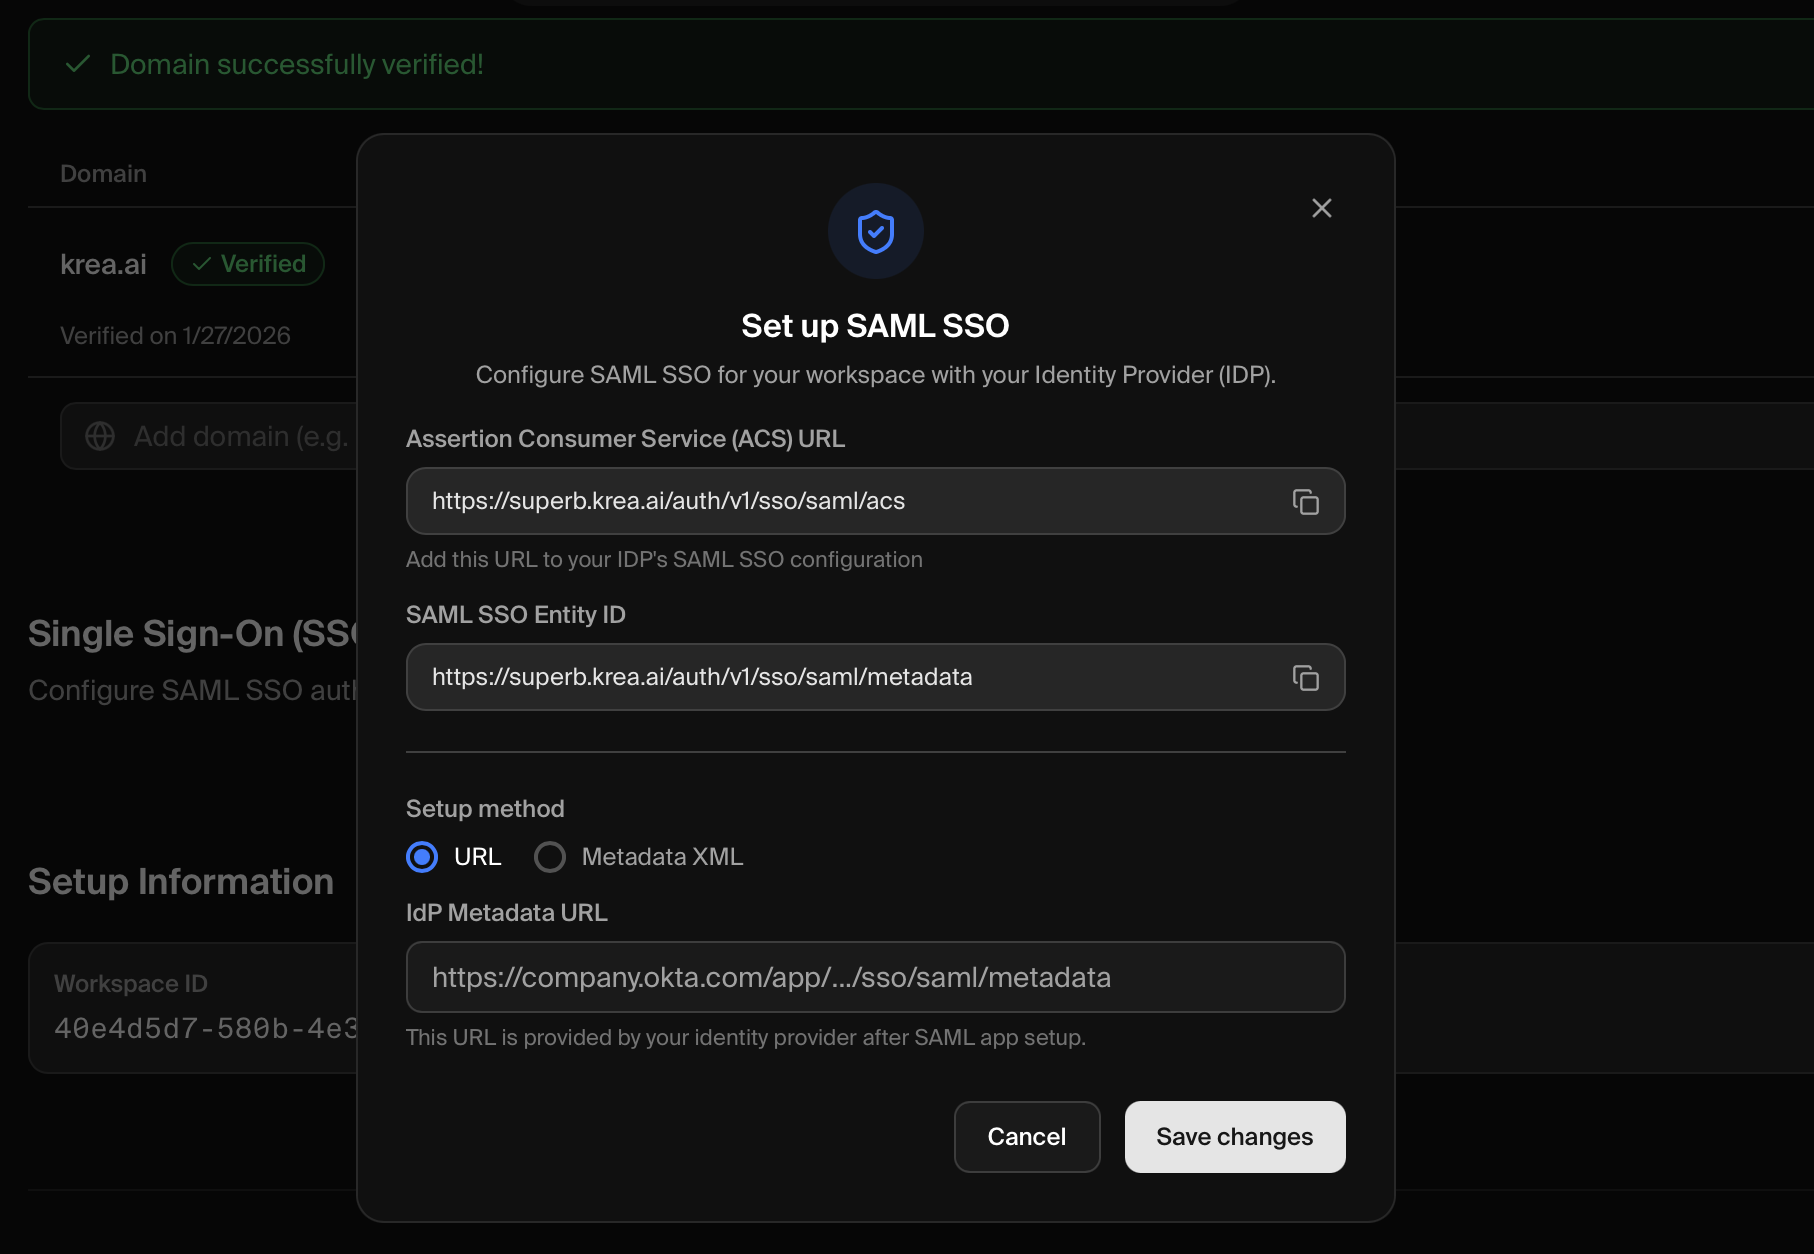 You’ll need these two values to configure your identity provider:
| Field | Value |
|---|---|
| ACS URL | https://superb.krea.ai/auth/v1/sso/saml/acs |
| Entity ID | https://superb.krea.ai/auth/v1/sso/saml/metadata |
| Metadata XML | https://superb.krea.ai/auth/v1/sso/saml/metadata |
Step 2: Configure Your Identity Provider
Create a SAML application in your identity provider using the values from Step 1.- Okta
- Google Workspace
Access Applications
Log in to your Okta Admin Console (typically
https://your-org.okta.com/admin) and go to Applications → Applications in the sidebar.Create App Integration
Click Create App Integration.Select SAML 2.0 as the sign-in method and click Next.
Configure General Settings
Enter Krea as the App name.Optionally upload a logo for easy identification.Click Next.
Configure SAML Settings
Enter the following values:
| Field | Value |
|---|---|
| Single sign-on URL | https://superb.krea.ai/auth/v1/sso/saml/acs |
| Audience URI (SP Entity ID) | https://superb.krea.ai/auth/v1/sso/saml/metadata |
| Name ID format | EmailAddress |
| Application username |
Complete Setup
Click Next.On the Feedback page, select “I’m an Okta customer adding an internal app” and click Finish.
Get Metadata URL
On the application page, go to the Sign On tab.Scroll down to SAML Signing Certificates and find the Metadata URL. Click Actions → View IdP metadata to get the URL.
Reference: Okta Help - Create SAML App Integrations ↗
Step 3: Connect Your IdP to Krea
Back in the Krea modal, provide your IdP’s metadata:- URL (Recommended)
- Metadata XML
Best for: Okta and other IdPs that provide a public metadata URL
- In the Krea modal, select the URL tab
- Paste your IdP’s Metadata URL into the text field
- Click Save changes
Using a URL allows Krea to automatically fetch updated certificates when your IdP rotates them.
Step 4: Test Your Configuration
Go to Krea Login
Navigate to krea.ai/login ↗
Success! If you can log in, your SAML SSO is configured correctly. Invite your team members to use the SSO button with their work email to sign in.
Enforce SAML SSO
Once SSO is configured and tested, you can enforce it for all users with your verified domain. This ensures everyone in your organization authenticates through your identity provider.
Go to Workspace Settings
Navigate to Workspace Settings ↗ and scroll to the Single Sign-On (SSO) section.
Disabling Enforcement
If you need to disable SSO enforcement:- Go to Workspace Settings ↗
- In the Single Sign-On (SSO) section, find the Enforce SSO toggle
- Click the toggle to disable enforcement
- Users will regain the ability to log in with password or magic link
Disabling enforcement does not disable SSO itself—users can still choose to log in via SSO using the SSO button on the login page.
Troubleshooting
Failed to configure SSO
Failed to configure SSO
- Check URLs — Ensure ACS URL and Entity ID are exactly as shown (no trailing slashes)
- Verify metadata access — If using a URL, make sure it’s publicly accessible
- Try XML instead — If the URL doesn’t work, download and paste the XML directly
- Check certificate expiry — Expired IdP certificates will cause configuration to fail
Users can't log in
Users can't log in
- Click SSO button — Users must click the SSO button on the login page (not just enter their email)
- Assign users in IdP — Users must be assigned to the Krea SAML app in your IdP
- Check Name ID — Verify Name ID is set to email/EmailAddress format in your IdP
- Verify email domain — User emails must match the verified domain exactly
- Check user provisioning — Users may need to be invited to the Krea workspace first
Getting 'Invalid SAML response' error
Getting 'Invalid SAML response' error
- Clock skew — Ensure your IdP server’s clock is accurate (within 5 minutes of actual time)
- Assertion conditions — Check that the SAML assertion’s NotBefore/NotOnOrAfter conditions are valid
- Signature issues — Verify the correct certificate is being used
Redirect loop or blank page
Redirect loop or blank page
- Clear cookies — Clear all Krea-related cookies and try again
- Check ACS URL — Ensure there are no typos in the ACS URL configured in your IdP
- Verify domain — Confirm the domain verification is still active
Managing SSO
Viewing SSO Status
- Go to Workspace Settings ↗
- Scroll to the Domain Management section
- The SSO card shows:
- Enabled status with a green indicator
- Your verified domain
- Configure button to modify settings
Updating IdP Metadata
If you need to update your IdP metadata (e.g., after certificate rotation):- Go to Workspace Settings ↗
- In the Domain Management section, click Configure on the SSO card
- Update the metadata URL or XML
- Click Save changes
Disabling SSO
- Go to Workspace Settings ↗
- In the Domain Management section, click Configure on the SSO card
- Click Disable SSO at the bottom of the modal
- Confirm the action
Need Help?
Enterprise Support
Contact our enterprise support team at support@krea.ai
Sales Team
Questions about Enterprise plans? Email sales@krea.ai